Hi All,
Over the last few months, I embarked on a project to make a realistic wooden Claptrap in my little 8'x10' shed/shop for my fiance. After many MANY hours, I gave it to her on Christmas and people kept telling me I should post my build so I figured this was a good place to start!
My Claptrap is made of basswood, poplar, cedar, and some oak. I found a lumber yard with 5 sq. foot bundles of "craft wood" so I got 3 basswood and 1 cedar. Poplar and oak was from Lowes, just craft wood / square dowels. Some other items and where I got them are listed as they come up in the pictures.
Enjoy!
Wheel:
First, I started with the wheel. I tried to source a good wheel from anywhere at all but I couldn't find something with the ratio I wanted for a price I could afford (I was going on a 2:1 diameter:width ratio as it seemed "close"). I ended up gluing 3 pieces of 2x8 construction pine, cut into rough circles, together then turning it on a lathe.
I measured out the spacing of the "spokes" on Photoshop and made a template for the hub and "spokes". After some drilling and Dremeling, I was more or less happy with the result.
For painting, I started with Rust-Oleum Automotive Spray Primer, which I like because it's quick, covers well and sands nicely. For the "rubber", I decided to try the Flex Seal spray that is advertised on TV a lot and it worked quite well! Maybe not a true tire, but it gave me the look and feel I wanted. Finally, I just used some Testors-type hobby paint for the rest, mixing as needed.
Suspension:
For the suspension, I spent probably a good hour or more staring at the copper pipe selections at Lowes. Pretty sure the employees thought I was trying to load my pockets with fittings or something since I must have been asked 10 times if I needed help... I finally started explaining what I was doing and once I would say "I need to make a suspension from plumbing parts" they would just smile and walk away, writing me off as nuts.
Through a combination of some special order springs from McMaster-Carr (great site for fasteners, springs, nuts, bolts and tons of other stuff), 3/4" couplers, a 3/4" repair sleeve cut into pieces, 1/2" pipe and 3/4" > 1/2" reducers, I was able to fabricate a "working" suspension in that it will compress with downward pressure and rebound when the pressure is removed. The springs are rated to around the weight of the Claptrap so the weight of the Claptrap won't compress them much at all.
The first picture also has the NICE bearings I got for the wheel (from McMaster-Carr), along with the 1/2 steel axle rod I got. The axle end caps would fit into the 3/4" copper elbows so I could fit it together with little axle showing.
After a lot of measuring, checking, cutting, and rechecking, I soldered everything together. Since I knew it wasn't actually load bearing, the solder is more than strong enough for what I needed.
![]()
[SMALLSHOT]http://i71.photobucket.com/albums/i160/SOMisICEMAn/Claptrap%20Build/img5.jpg[/SMALLSHOT][SMALLSHOT]http://i71.photobucket.com/albums/i160/SOMisICEMAn/Claptrap%20Build/Img6.jpg[/SMALLSHOT]
Body:
Sides / Back / Suspension Mount:
I started with the "Bottom" of the Claptrap, where the suspension would mount into the chassis. For my measurements, I took some in-game screenshots of various claptrap angles and printed them out, then used some old high school trig to do the math on what I thought the different angles were. Since it was pencil and ruler measurements on slightly ambiguous images, I just made sure the numbers seemed close then went with them. If anyone wants my numbers, let me know but I don't have them in front of me right now.
From the bottom, I went to the back, then 2 sides. I decided to do a 45 degree type connection between the backs and the sides and in retrospect, I should have just squared them off. It would have been a ton easier and with sanding and painting, you could never have told the difference.
After my 3 sides were up, I cut and fit the side insets where the arms extend from.
The next thing I made was the cedar box bottom for the top "box" part. I used square popular dowels for the mounting rests, glued 2 cedar pieces together. The craft bundles were great but I had to work around 8-10" max width so a few parts (cedar bottom, back panel, top) are joined pieces.
Next, I put in the "false bottom". Since mounting the suspension was a bit of a challenge and I didn't want stability issues, my plan from the beginning was to have both the real and false bottom, separated by about 2", allowing the suspension to pass inside the chassis through the true bottom before being attached at the false bottom, and a snug fit as it passed through the real bottom gave stability to the suspension. I did a test fit of the suspension after that.
The Drawer:
I wanted to maximize the size of the drawer so I decided to use all available side space. As such, the drawer ended up with a number of angled challenges. I also realized early on that I would need to use a bottom-mount slide to get the best look and best use of the room available. Since the depth of my Claptrap was not deep enough to use a standard bottom-mount slide, I had to fabricate one out of wood. I was very happy with how it came out but it took a bit longer than I was planning for this part. The drawer is cedar, except the front which is the same basswood as the body. The contact portions of the slide are poplar since it's a significantly harder wood than my other choices.
I also started blocking in the front at this point, with the first two panels.
![]()
[SMALLSHOT]http://i71.photobucket.com/albums/i160/SOMisICEMAn/Claptrap%20Build/img15d.jpg[/SMALLSHOT][SMALLSHOT]http://i71.photobucket.com/albums/i160/SOMisICEMAn/Claptrap%20Build/img15f.jpg[/SMALLSHOT][SMALLSHOT]http://i71.photobucket.com/albums/i160/SOMisICEMAn/Claptrap%20Build/img15g.jpg[/SMALLSHOT]
The Eye:
Probably one of my proudest parts of the build was the eye. I thought it came out pretty neat and it took some more wandering at Lowes to do it. I started around a circular remote controlled LED light I found on superbrightleds.com that let me pick the color I wanted and that I could use by remote. The price was also very affordable at about $10 + shipping.
From there, I had to figure out how to mount it and what to use for a lens. I tried a few wooden constructs for the outer container but I couldn't get the thickness down and I was going to use a small Pyrex dish for the lens but again, too thick and hard to deal with. I thought about different options (petri dishes, forming Plexi etc) and none of them seemed right.
Finally, I ended up in Lowes. After a good hour or so, I found a small round aluminum bar-b-que drip dish that I figured I could cut the bottom out of for the rim and the hardest part, the lens, a Genie parking stop system package! So I got the parking ball, cut it out carefully, and kept the blister pack for my lens.
I then sprayed both the light and the inside of the lens with spray window frosting (like what you would find on bathroom windows) to diffuse the light from the point sources of the LED into a glow of the Claptrap. All of this was mounted on a wooden ring with high-strength magnets that would latch onto a metal bar so I could remove it easily to change the batteries etc...
![]()
[SMALLSHOT]http://i71.photobucket.com/albums/i160/SOMisICEMAn/Claptrap%20Build/img20b.jpg[/SMALLSHOT][SMALLSHOT]http://i71.photobucket.com/albums/i160/SOMisICEMAn/Claptrap%20Build/img20.jpg[/SMALLSHOT][SMALLSHOT]http://i71.photobucket.com/albums/i160/SOMisICEMAn/Claptrap%20Build/img21.jpg[/SMALLSHOT]
[SMALLSHOT]http://i71.photobucket.com/albums/i160/SOMisICEMAn/Claptrap%20Build/img22.jpg[/SMALLSHOT][SMALLSHOT]http://i71.photobucket.com/albums/i160/SOMisICEMAn/Claptrap%20Build/img23.jpg[/SMALLSHOT][SMALLSHOT]http://i71.photobucket.com/albums/i160/SOMisICEMAn/Claptrap%20Build/img26.jpg[/SMALLSHOT]
The Box:
Around the time I was messing with the eye, I also got the box part finished. I first lined and glued cedar around the box, then topped it with an oak trim. Lots of fiddly bits on the little band saw.
The Arms:
For the arms, I used oak and poplar dowels I had from another project. I turned the upper parts on my lathe to get the basic shape of Claptrap's upper arms, while the bottoms were straight dowels. I used stacked fender washers for the size at either end and used double-ended dowel screws, wood to metal, on one half of each connection and used brass wood inserts on the other so I could unscrew the arms down to each part. I made the elbow joints as well and picked up a set of security camera mounts from Amazon to use for the shoulders (I didn't get any good shots of the shoulders). I used some red #10 wire I had for the wire parts, glued in with good old JB-Weld (shown later).
The Top:
The top ended up being 2 pieces together. The arm covers I did by making a wooden hinge with finishing nails as the pins. The vented center-line was a lot of time with the Dremel. It was then attached with a long piano hinge across almost the entire width and uses magnets along the bottom of the front edge to align with mirrored magnets along the top of the front edge of the box.
The Loot Chest:
To hold the remote, and also to make a neat little box, I decided to do a loot chest based on the "Diamond plate loot chest" look. I cut out ovals with my scroll saw and glue/clamped them together. After sanding, filling, and some very small Dremel work on the front, I was happy with the result. The remote shelf lifts out and there is a bit of storage below it.
The Paint Job:
I started the paint job with a full coat of my trusty Rust-Oleum auto primer, then sanded and re-primed. For the main coat, I used Rust-Oleum protective enamel since I could get small cans from Lowes and WalMart. For the yellow, I hand mixed some gloss "Sunburst Yellow" with some "Sunrise Red" and a bit of flat black to get the orangy tone I wanted.
After that dried, I did the trim in some flat black cut with a touch of flat white. I then taped off the center white band and also taped the areas I was going to have the white "pealed away" for the weathered look. I found a good can of a satin dark brown spray paint that I used for the dirt at the bottom and feathered it up. I also sprayed that brown into a cup and used my gloved finger to put it along the edges to make them pop out. I also did the red and white pin-striping along the top, touching up as needed.
To really get the battered, weathered look, I spent a lot of time sanding down the white to make it blend the areas with no white and also "dirtied" the whole thing with my brown spray paint+glove and a bit of thinner. I would wipe it on the yellow, then smear it around until I thought it was right. The nice thing about the thick, heavy base coat was that the thinner didn't do much of anything to it so I could wipe off my brown and re-try if I needed.
Finished Product:
![]()
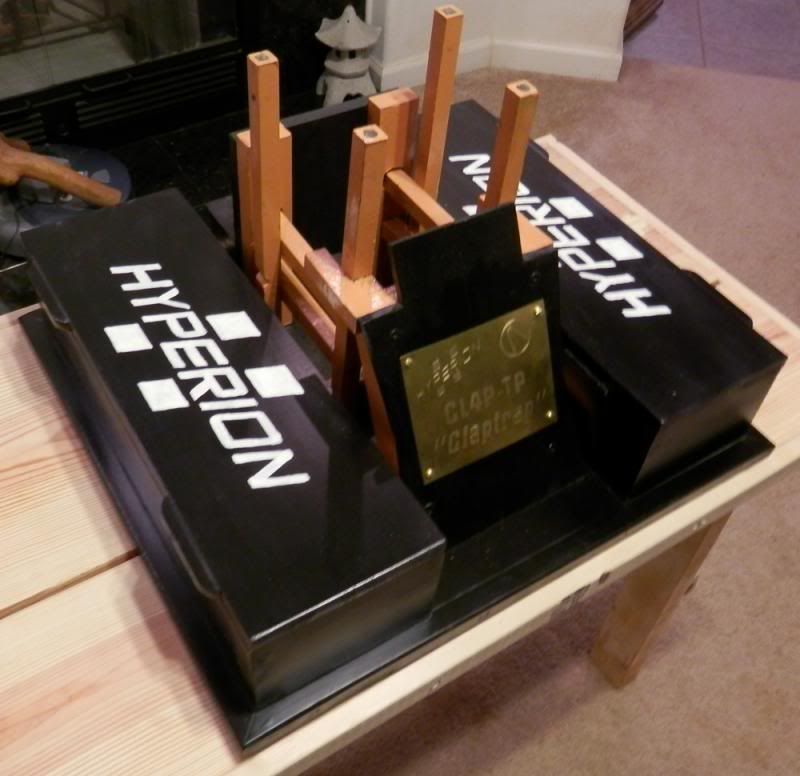
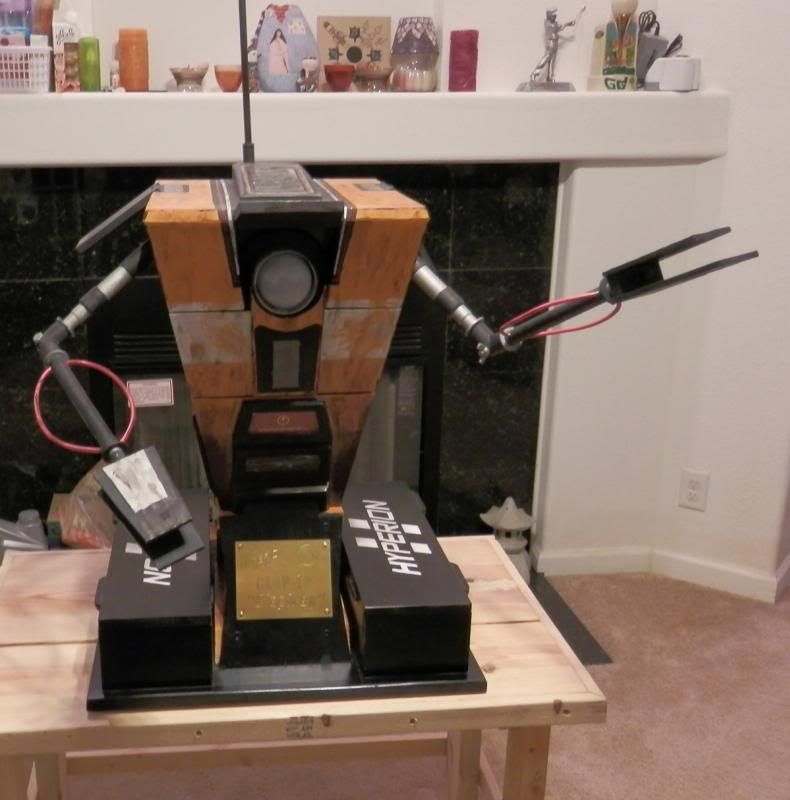
I didn't take any pictures of the base while I was building it, except where it randomly appears in other images,
so I figured it deserves at least one stand-alone shot. I wanted the Claptrap to be removable and be able to
"roll" on his wheel, so this is designed for him to lift in and out.
![]()
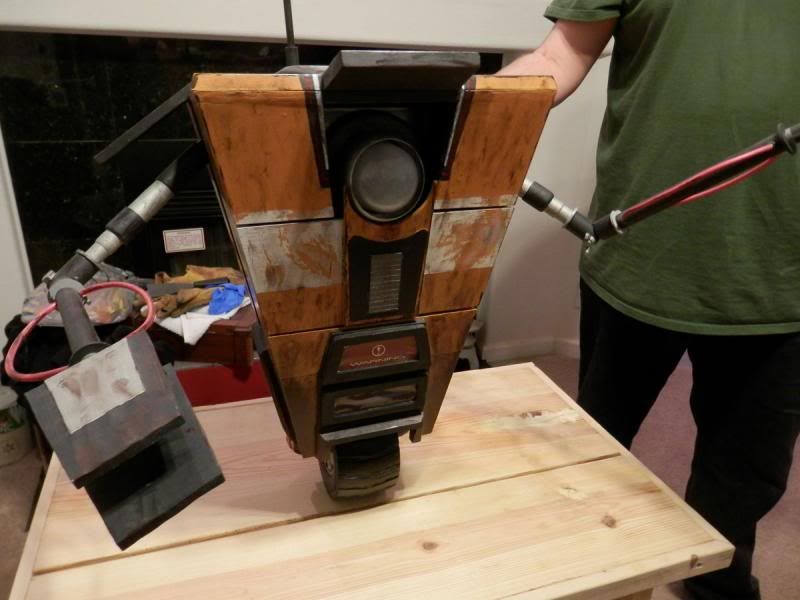
Claptrap out of his base
![]()
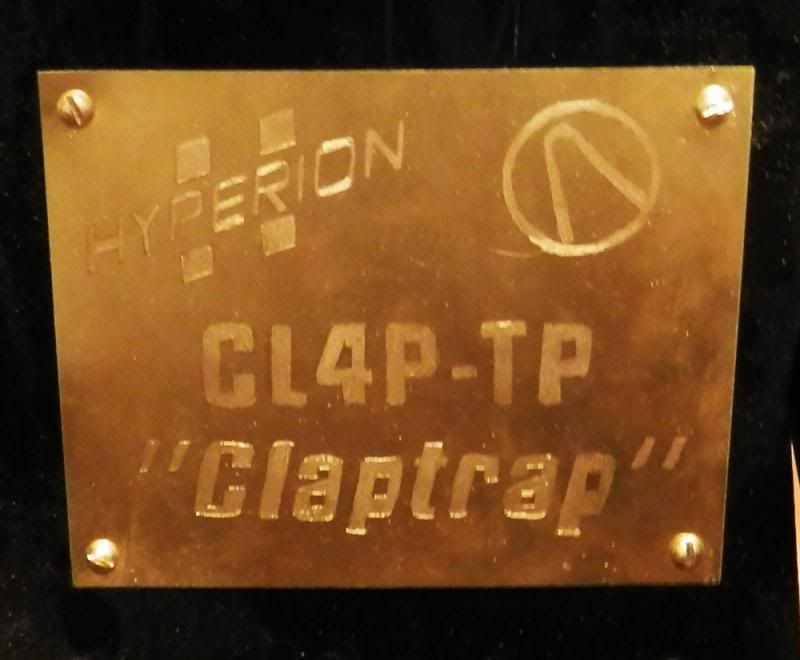
Brass frontplate that I engraved with some diamond Dremel bits after spending 2 movies cutting out the stencil
![]()
[SMALLSHOT]http://i71.photobucket.com/albums/i160/SOMisICEMAn/Claptrap%20Build/img56.jpg[/SMALLSHOT][SMALLSHOT]http://i71.photobucket.com/albums/i160/SOMisICEMAn/Claptrap%20Build/img57.jpg[/SMALLSHOT][SMALLSHOT]http://i71.photobucket.com/albums/i160/SOMisICEMAn/Claptrap%20Build/img58.jpg[/SMALLSHOT]
[SMALLSHOT]http://i71.photobucket.com/albums/i160/SOMisICEMAn/Claptrap%20Build/img60.jpg[/SMALLSHOT][SMALLSHOT]http://i71.photobucket.com/albums/i160/SOMisICEMAn/Claptrap%20Build/img59.jpg[/SMALLSHOT]
[SMALLSHOT]http://i71.photobucket.com/albums/i160/SOMisICEMAn/Claptrap%20Build/img62.jpg[/SMALLSHOT][SMALLSHOT]http://i71.photobucket.com/albums/i160/SOMisICEMAn/Claptrap%20Build/img65.jpg[/SMALLSHOT]
![]()
[SMALLSHOT]http://i71.photobucket.com/albums/i160/SOMisICEMAn/Claptrap%20Build/img69.jpg[/SMALLSHOT][SMALLSHOT]http://i71.photobucket.com/albums/i160/SOMisICEMAn/Claptrap%20Build/img68.jpg[/SMALLSHOT]
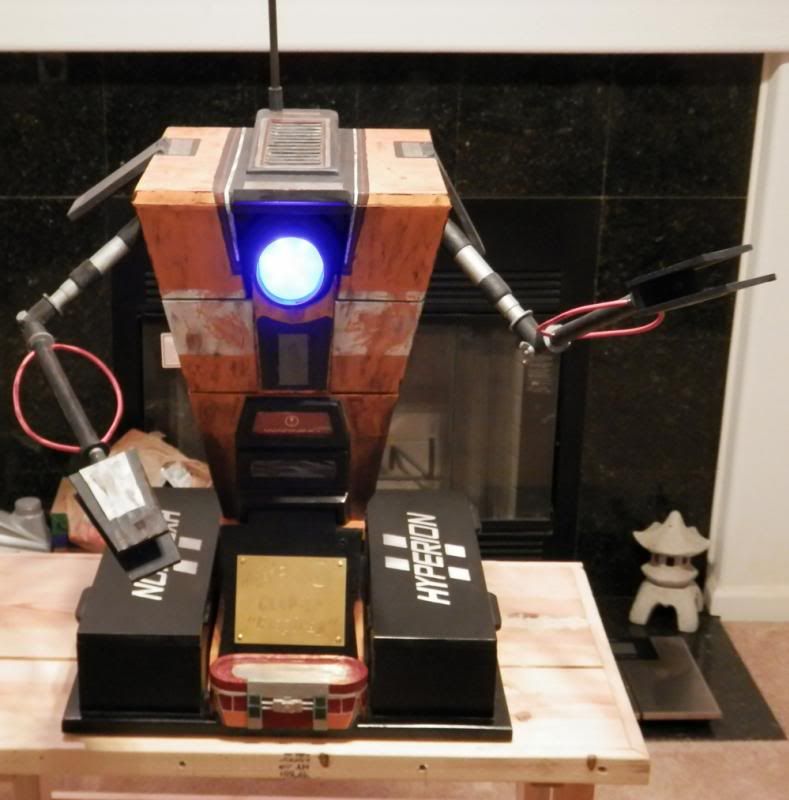
With the light on, red and blue.
I hope you enjoyed my build. I thought it came out pretty good. If you are at all tempted to try something like this, the three things I would say are 1. it will cost more than you think or pencil out, 2. when budgeting time, figure out how long you think it will take, then multiply by 1.5 at the very least and 3. try not to sweat the small stuff.
Mistakes will be made but you can cover them all or work around them. I know I made a bunch (but I won't point out where!). My dad gave me great advice when he said "paint and molding cover a multitude of sins".
I have a Photobucket album with larger versions of the images here if you want to see them for some reason. I'll be checking this thread so if you have any questions or comments, just let me know!
Over the last few months, I embarked on a project to make a realistic wooden Claptrap in my little 8'x10' shed/shop for my fiance. After many MANY hours, I gave it to her on Christmas and people kept telling me I should post my build so I figured this was a good place to start!
My Claptrap is made of basswood, poplar, cedar, and some oak. I found a lumber yard with 5 sq. foot bundles of "craft wood" so I got 3 basswood and 1 cedar. Poplar and oak was from Lowes, just craft wood / square dowels. Some other items and where I got them are listed as they come up in the pictures.
Enjoy!
Wheel:
First, I started with the wheel. I tried to source a good wheel from anywhere at all but I couldn't find something with the ratio I wanted for a price I could afford (I was going on a 2:1 diameter:width ratio as it seemed "close"). I ended up gluing 3 pieces of 2x8 construction pine, cut into rough circles, together then turning it on a lathe.
I measured out the spacing of the "spokes" on Photoshop and made a template for the hub and "spokes". After some drilling and Dremeling, I was more or less happy with the result.
[SMALLSHOT]http://i71.photobucket.com/albums/i160/SOMisICEMAn/Claptrap%20Build/img1.jpg[/SMALLSHOT][SMALLSHOT]http://i71.photobucket.com/albums/i160/SOMisICEMAn/Claptrap%20Build/img3.jpg[/SMALLSHOT][SMALLSHOT]http://i71.photobucket.com/albums/i160/SOMisICEMAn/Claptrap%20Build/img2.jpg[/SMALLSHOT]
For painting, I started with Rust-Oleum Automotive Spray Primer, which I like because it's quick, covers well and sands nicely. For the "rubber", I decided to try the Flex Seal spray that is advertised on TV a lot and it worked quite well! Maybe not a true tire, but it gave me the look and feel I wanted. Finally, I just used some Testors-type hobby paint for the rest, mixing as needed.
[SMALLSHOT]http://i71.photobucket.com/albums/i160/SOMisICEMAn/Claptrap%20Build/img8.jpg[/SMALLSHOT][SMALLSHOT]http://i71.photobucket.com/albums/i160/SOMisICEMAn/Claptrap%20Build/img7.jpg[/SMALLSHOT]
![]()
Suspension:
For the suspension, I spent probably a good hour or more staring at the copper pipe selections at Lowes. Pretty sure the employees thought I was trying to load my pockets with fittings or something since I must have been asked 10 times if I needed help... I finally started explaining what I was doing and once I would say "I need to make a suspension from plumbing parts" they would just smile and walk away, writing me off as nuts.
Through a combination of some special order springs from McMaster-Carr (great site for fasteners, springs, nuts, bolts and tons of other stuff), 3/4" couplers, a 3/4" repair sleeve cut into pieces, 1/2" pipe and 3/4" > 1/2" reducers, I was able to fabricate a "working" suspension in that it will compress with downward pressure and rebound when the pressure is removed. The springs are rated to around the weight of the Claptrap so the weight of the Claptrap won't compress them much at all.
The first picture also has the NICE bearings I got for the wheel (from McMaster-Carr), along with the 1/2 steel axle rod I got. The axle end caps would fit into the 3/4" copper elbows so I could fit it together with little axle showing.
After a lot of measuring, checking, cutting, and rechecking, I soldered everything together. Since I knew it wasn't actually load bearing, the solder is more than strong enough for what I needed.
[SMALLSHOT]http://i71.photobucket.com/albums/i160/SOMisICEMAn/Claptrap%20Build/img5.jpg[/SMALLSHOT][SMALLSHOT]http://i71.photobucket.com/albums/i160/SOMisICEMAn/Claptrap%20Build/Img6.jpg[/SMALLSHOT]
Body:
Sides / Back / Suspension Mount:
I started with the "Bottom" of the Claptrap, where the suspension would mount into the chassis. For my measurements, I took some in-game screenshots of various claptrap angles and printed them out, then used some old high school trig to do the math on what I thought the different angles were. Since it was pencil and ruler measurements on slightly ambiguous images, I just made sure the numbers seemed close then went with them. If anyone wants my numbers, let me know but I don't have them in front of me right now.
From the bottom, I went to the back, then 2 sides. I decided to do a 45 degree type connection between the backs and the sides and in retrospect, I should have just squared them off. It would have been a ton easier and with sanding and painting, you could never have told the difference.
After my 3 sides were up, I cut and fit the side insets where the arms extend from.
[SMALLSHOT]http://i71.photobucket.com/albums/i160/SOMisICEMAn/Claptrap%20Build/img9.jpg[/SMALLSHOT][SMALLSHOT]http://i71.photobucket.com/albums/i160/SOMisICEMAn/Claptrap%20Build/img11.jpg[/SMALLSHOT]
[SMALLSHOT]http://i71.photobucket.com/albums/i160/SOMisICEMAn/Claptrap%20Build/img12.jpg[/SMALLSHOT][SMALLSHOT]http://i71.photobucket.com/albums/i160/SOMisICEMAn/Claptrap%20Build/img13.jpg[/SMALLSHOT]
[SMALLSHOT]http://i71.photobucket.com/albums/i160/SOMisICEMAn/Claptrap%20Build/img12.jpg[/SMALLSHOT][SMALLSHOT]http://i71.photobucket.com/albums/i160/SOMisICEMAn/Claptrap%20Build/img13.jpg[/SMALLSHOT]
The next thing I made was the cedar box bottom for the top "box" part. I used square popular dowels for the mounting rests, glued 2 cedar pieces together. The craft bundles were great but I had to work around 8-10" max width so a few parts (cedar bottom, back panel, top) are joined pieces.
[SMALLSHOT]http://i71.photobucket.com/albums/i160/SOMisICEMAn/Claptrap%20Build/img13.jpg[/SMALLSHOT][SMALLSHOT]http://i71.photobucket.com/albums/i160/SOMisICEMAn/Claptrap%20Build/img14.jpg[/SMALLSHOT][SMALLSHOT]http://i71.photobucket.com/albums/i160/SOMisICEMAn/Claptrap%20Build/img16.jpg[/SMALLSHOT]
Next, I put in the "false bottom". Since mounting the suspension was a bit of a challenge and I didn't want stability issues, my plan from the beginning was to have both the real and false bottom, separated by about 2", allowing the suspension to pass inside the chassis through the true bottom before being attached at the false bottom, and a snug fit as it passed through the real bottom gave stability to the suspension. I did a test fit of the suspension after that.
[SMALLSHOT]http://i71.photobucket.com/albums/i160/SOMisICEMAn/Claptrap%20Build/img15b.jpg[/SMALLSHOT][SMALLSHOT]http://i71.photobucket.com/albums/i160/SOMisICEMAn/Claptrap%20Build/img15c.jpg[/SMALLSHOT][SMALLSHOT]http://i71.photobucket.com/albums/i160/SOMisICEMAn/Claptrap%20Build/img17.jpg[/SMALLSHOT]
The Drawer:
I wanted to maximize the size of the drawer so I decided to use all available side space. As such, the drawer ended up with a number of angled challenges. I also realized early on that I would need to use a bottom-mount slide to get the best look and best use of the room available. Since the depth of my Claptrap was not deep enough to use a standard bottom-mount slide, I had to fabricate one out of wood. I was very happy with how it came out but it took a bit longer than I was planning for this part. The drawer is cedar, except the front which is the same basswood as the body. The contact portions of the slide are poplar since it's a significantly harder wood than my other choices.
I also started blocking in the front at this point, with the first two panels.
[SMALLSHOT]http://i71.photobucket.com/albums/i160/SOMisICEMAn/Claptrap%20Build/img15d.jpg[/SMALLSHOT][SMALLSHOT]http://i71.photobucket.com/albums/i160/SOMisICEMAn/Claptrap%20Build/img15f.jpg[/SMALLSHOT][SMALLSHOT]http://i71.photobucket.com/albums/i160/SOMisICEMAn/Claptrap%20Build/img15g.jpg[/SMALLSHOT]
The Eye:
Probably one of my proudest parts of the build was the eye. I thought it came out pretty neat and it took some more wandering at Lowes to do it. I started around a circular remote controlled LED light I found on superbrightleds.com that let me pick the color I wanted and that I could use by remote. The price was also very affordable at about $10 + shipping.
From there, I had to figure out how to mount it and what to use for a lens. I tried a few wooden constructs for the outer container but I couldn't get the thickness down and I was going to use a small Pyrex dish for the lens but again, too thick and hard to deal with. I thought about different options (petri dishes, forming Plexi etc) and none of them seemed right.
Finally, I ended up in Lowes. After a good hour or so, I found a small round aluminum bar-b-que drip dish that I figured I could cut the bottom out of for the rim and the hardest part, the lens, a Genie parking stop system package! So I got the parking ball, cut it out carefully, and kept the blister pack for my lens.
I then sprayed both the light and the inside of the lens with spray window frosting (like what you would find on bathroom windows) to diffuse the light from the point sources of the LED into a glow of the Claptrap. All of this was mounted on a wooden ring with high-strength magnets that would latch onto a metal bar so I could remove it easily to change the batteries etc...
[SMALLSHOT]http://i71.photobucket.com/albums/i160/SOMisICEMAn/Claptrap%20Build/img20b.jpg[/SMALLSHOT][SMALLSHOT]http://i71.photobucket.com/albums/i160/SOMisICEMAn/Claptrap%20Build/img20.jpg[/SMALLSHOT][SMALLSHOT]http://i71.photobucket.com/albums/i160/SOMisICEMAn/Claptrap%20Build/img21.jpg[/SMALLSHOT]
[SMALLSHOT]http://i71.photobucket.com/albums/i160/SOMisICEMAn/Claptrap%20Build/img22.jpg[/SMALLSHOT][SMALLSHOT]http://i71.photobucket.com/albums/i160/SOMisICEMAn/Claptrap%20Build/img23.jpg[/SMALLSHOT][SMALLSHOT]http://i71.photobucket.com/albums/i160/SOMisICEMAn/Claptrap%20Build/img26.jpg[/SMALLSHOT]
The Box:
Around the time I was messing with the eye, I also got the box part finished. I first lined and glued cedar around the box, then topped it with an oak trim. Lots of fiddly bits on the little band saw.
[SMALLSHOT]http://i71.photobucket.com/albums/i160/SOMisICEMAn/Claptrap%20Build/img24.jpg[/SMALLSHOT][SMALLSHOT]http://i71.photobucket.com/albums/i160/SOMisICEMAn/Claptrap%20Build/img27.jpg[/SMALLSHOT][SMALLSHOT]http://i71.photobucket.com/albums/i160/SOMisICEMAn/Claptrap%20Build/img28.jpg[/SMALLSHOT]
The Arms:
For the arms, I used oak and poplar dowels I had from another project. I turned the upper parts on my lathe to get the basic shape of Claptrap's upper arms, while the bottoms were straight dowels. I used stacked fender washers for the size at either end and used double-ended dowel screws, wood to metal, on one half of each connection and used brass wood inserts on the other so I could unscrew the arms down to each part. I made the elbow joints as well and picked up a set of security camera mounts from Amazon to use for the shoulders (I didn't get any good shots of the shoulders). I used some red #10 wire I had for the wire parts, glued in with good old JB-Weld (shown later).
[SMALLSHOT]http://i71.photobucket.com/albums/i160/SOMisICEMAn/Claptrap%20Build/img29.jpg[/SMALLSHOT]
The Top:
The top ended up being 2 pieces together. The arm covers I did by making a wooden hinge with finishing nails as the pins. The vented center-line was a lot of time with the Dremel. It was then attached with a long piano hinge across almost the entire width and uses magnets along the bottom of the front edge to align with mirrored magnets along the top of the front edge of the box.
[SMALLSHOT]http://i71.photobucket.com/albums/i160/SOMisICEMAn/Claptrap%20Build/img30.jpg[/SMALLSHOT][SMALLSHOT]http://i71.photobucket.com/albums/i160/SOMisICEMAn/Claptrap%20Build/img31.jpg[/SMALLSHOT]
The Loot Chest:
To hold the remote, and also to make a neat little box, I decided to do a loot chest based on the "Diamond plate loot chest" look. I cut out ovals with my scroll saw and glue/clamped them together. After sanding, filling, and some very small Dremel work on the front, I was happy with the result. The remote shelf lifts out and there is a bit of storage below it.
[SMALLSHOT]http://i71.photobucket.com/albums/i160/SOMisICEMAn/Claptrap%20Build/img40.jpg[/SMALLSHOT][SMALLSHOT]http://i71.photobucket.com/albums/i160/SOMisICEMAn/Claptrap%20Build/img41.jpg[/SMALLSHOT]
[SMALLSHOT]http://i71.photobucket.com/albums/i160/SOMisICEMAn/Claptrap%20Build/img50.jpg[/SMALLSHOT][SMALLSHOT]http://i71.photobucket.com/albums/i160/SOMisICEMAn/Claptrap%20Build/img49.jpg[/SMALLSHOT]
[SMALLSHOT]http://i71.photobucket.com/albums/i160/SOMisICEMAn/Claptrap%20Build/img50.jpg[/SMALLSHOT][SMALLSHOT]http://i71.photobucket.com/albums/i160/SOMisICEMAn/Claptrap%20Build/img49.jpg[/SMALLSHOT]
The Paint Job:
I started the paint job with a full coat of my trusty Rust-Oleum auto primer, then sanded and re-primed. For the main coat, I used Rust-Oleum protective enamel since I could get small cans from Lowes and WalMart. For the yellow, I hand mixed some gloss "Sunburst Yellow" with some "Sunrise Red" and a bit of flat black to get the orangy tone I wanted.
[SMALLSHOT]http://i71.photobucket.com/albums/i160/SOMisICEMAn/Claptrap%20Build/Img32.jpg[/SMALLSHOT][SMALLSHOT]http://i71.photobucket.com/albums/i160/SOMisICEMAn/Claptrap%20Build/img33.jpg[/SMALLSHOT][SMALLSHOT]http://i71.photobucket.com/albums/i160/SOMisICEMAn/Claptrap%20Build/img35.jpg[/SMALLSHOT]
After that dried, I did the trim in some flat black cut with a touch of flat white. I then taped off the center white band and also taped the areas I was going to have the white "pealed away" for the weathered look. I found a good can of a satin dark brown spray paint that I used for the dirt at the bottom and feathered it up. I also sprayed that brown into a cup and used my gloved finger to put it along the edges to make them pop out. I also did the red and white pin-striping along the top, touching up as needed.
[SMALLSHOT]http://i71.photobucket.com/albums/i160/SOMisICEMAn/Claptrap%20Build/img36.jpg[/SMALLSHOT][SMALLSHOT]http://i71.photobucket.com/albums/i160/SOMisICEMAn/Claptrap%20Build/img37.jpg[/SMALLSHOT][SMALLSHOT]http://i71.photobucket.com/albums/i160/SOMisICEMAn/Claptrap%20Build/img38.jpg[/SMALLSHOT]
To really get the battered, weathered look, I spent a lot of time sanding down the white to make it blend the areas with no white and also "dirtied" the whole thing with my brown spray paint+glove and a bit of thinner. I would wipe it on the yellow, then smear it around until I thought it was right. The nice thing about the thick, heavy base coat was that the thinner didn't do much of anything to it so I could wipe off my brown and re-try if I needed.
Finished Product:
I didn't take any pictures of the base while I was building it, except where it randomly appears in other images,
so I figured it deserves at least one stand-alone shot. I wanted the Claptrap to be removable and be able to
"roll" on his wheel, so this is designed for him to lift in and out.
Claptrap out of his base
Brass frontplate that I engraved with some diamond Dremel bits after spending 2 movies cutting out the stencil
[SMALLSHOT]http://i71.photobucket.com/albums/i160/SOMisICEMAn/Claptrap%20Build/img56.jpg[/SMALLSHOT][SMALLSHOT]http://i71.photobucket.com/albums/i160/SOMisICEMAn/Claptrap%20Build/img57.jpg[/SMALLSHOT][SMALLSHOT]http://i71.photobucket.com/albums/i160/SOMisICEMAn/Claptrap%20Build/img58.jpg[/SMALLSHOT]
[SMALLSHOT]http://i71.photobucket.com/albums/i160/SOMisICEMAn/Claptrap%20Build/img60.jpg[/SMALLSHOT][SMALLSHOT]http://i71.photobucket.com/albums/i160/SOMisICEMAn/Claptrap%20Build/img59.jpg[/SMALLSHOT]
[SMALLSHOT]http://i71.photobucket.com/albums/i160/SOMisICEMAn/Claptrap%20Build/img62.jpg[/SMALLSHOT][SMALLSHOT]http://i71.photobucket.com/albums/i160/SOMisICEMAn/Claptrap%20Build/img65.jpg[/SMALLSHOT]
[SMALLSHOT]http://i71.photobucket.com/albums/i160/SOMisICEMAn/Claptrap%20Build/img69.jpg[/SMALLSHOT][SMALLSHOT]http://i71.photobucket.com/albums/i160/SOMisICEMAn/Claptrap%20Build/img68.jpg[/SMALLSHOT]
With the light on, red and blue.
I hope you enjoyed my build. I thought it came out pretty good. If you are at all tempted to try something like this, the three things I would say are 1. it will cost more than you think or pencil out, 2. when budgeting time, figure out how long you think it will take, then multiply by 1.5 at the very least and 3. try not to sweat the small stuff.
Mistakes will be made but you can cover them all or work around them. I know I made a bunch (but I won't point out where!). My dad gave me great advice when he said "paint and molding cover a multitude of sins".
I have a Photobucket album with larger versions of the images here if you want to see them for some reason. I'll be checking this thread so if you have any questions or comments, just let me know!